Menu

Zachariah Baker
(1098) (4)
Understanding the Parts of a Traditional Coil Tattoo Machine and How to Tune It Properly
Introduction
The coil tattoo machine is a staple in the tattoo industry, known for its power, precision, and customization potential. Unlike rotary machines, which use a direct motor, coil machines operate using an electromagnetic circuit to drive the needle.
For professional tattoo artists, understanding the components, tuning process, and troubleshooting techniques is crucial for achieving smooth, consistent lines and shading. This guide will cover each part of a coil machine, how to properly tune it, and common problems with solutions to keep your machine running at peak performance.
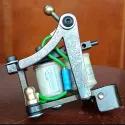
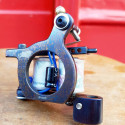
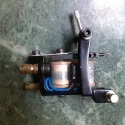
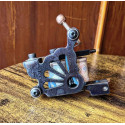
Key Components of a Coil Tattoo Machine
Before diving into tuning, let’s break down the essential parts of a traditional coil tattoo machine and their functions:
1. Frame
The frame holds all the components of the tattoo machine together. It can be made from steel, brass, aluminum, or other metals, with each material affecting the machine’s weight, balance, and performance.
2. Coils
The coils are the heart of a coil machine. They create an electromagnetic field that pulls the armature bar downward, allowing the needle to move up and down.
3. Armature Bar
The armature bar is a metal bar that moves up and down, controlling the needle’s motion. When the machine is running, the coils magnetize and pull the armature bar downward, breaking the circuit and allowing the spring to reset.
4. Springs (Front and Back)
The front and back springs help control the speed, tension, and give of the machine.
5. Contact Screw
The contact screw connects with the front spring to open and close the circuit, controlling the machine’s speed and frequency. Adjusting this screw affects how hard or soft the machine hits.
6. Capacitor
The capacitor regulates the voltage and smoothness of the electrical current. Different capacitors are used for lining and shading machines. A liner typically uses a 22µF capacitor, while a shader may use a 47µF capacitor.
7. Binding Posts
These secure the contact screw and clip cord connection, ensuring a stable power flow.
8. Clip Cord or RCA Connection
This is the power input that connects your machine to the power supply via a clip cord or RCA connection.
9. Needle and Tube Setup
Steps for Tuning Your Tattoo Machine
Now that you understand the key components, let’s go step by step to tune your coil machine properly.
1. Identify the Contact Gap
2. Adjust the Contact Screw
3. Secure the Coils
4. Powering Your Machine
Common Problems and How to Fix Them
Even when properly tuned, tattoo machines can encounter issues that require troubleshooting. Here are some common problems and how to fix them:
1. Needle Not Moving (Back Spring Tension Issues)
2. Machine Overheating
3. Irregular Power Flow
4. Excessive Vibration or Noise
Final Thoughts
Properly tuning your coil tattoo machine ensures that you deliver clean, consistent tattoos without issues. By understanding each component, making the right adjustments, and knowing how to troubleshoot problems, you can maximize your machine’s performance and longevity.
For high-quality tattoo machines, needles, and supplies, visit BSMC.FR—your trusted fournisseur de matériel de tatouage.
Baker Waters Shader

Baker Waters Liner
Baker Perfect Electric en acier de damas

Baker Perfect Electric
Baker modded Jonesy Shader Edition Limitée

Baker Modifié Jonesy Liner Edition Limitée
Shadercoils 1 inch / 10 wraps190 gr

Liner coils 1 inch / 8 turns 180g
Baker McKeever Shader

Baker McKeever Liner
ShaderCoils 1 inch / 10 wrap190 gr

Linercoils 1 inch / 8 Tours190 gr
check_circle
check_circle
 Whatsapp
